Introduction
I’ve always been interested in making all things smart through the use of cheap electronics and computers, moving all the “brains” from expensive hardware to hopefully Open Source Software. Today you can buy really cheap sensors on the internet and modify them to fit your purposes thanks to the numerous tutorials you can find online in great websites such as Instructables (here is one of my favorites). Since 2012 I’ve been building up stuff for my home, first very basic, today much more complex. Since people keep asking me why and how I do this stuff, I figured I should just write about it in this extended blog post.
TLDR: I have a huge number of contraptions in my house to make it “smart”.
Version 1.0
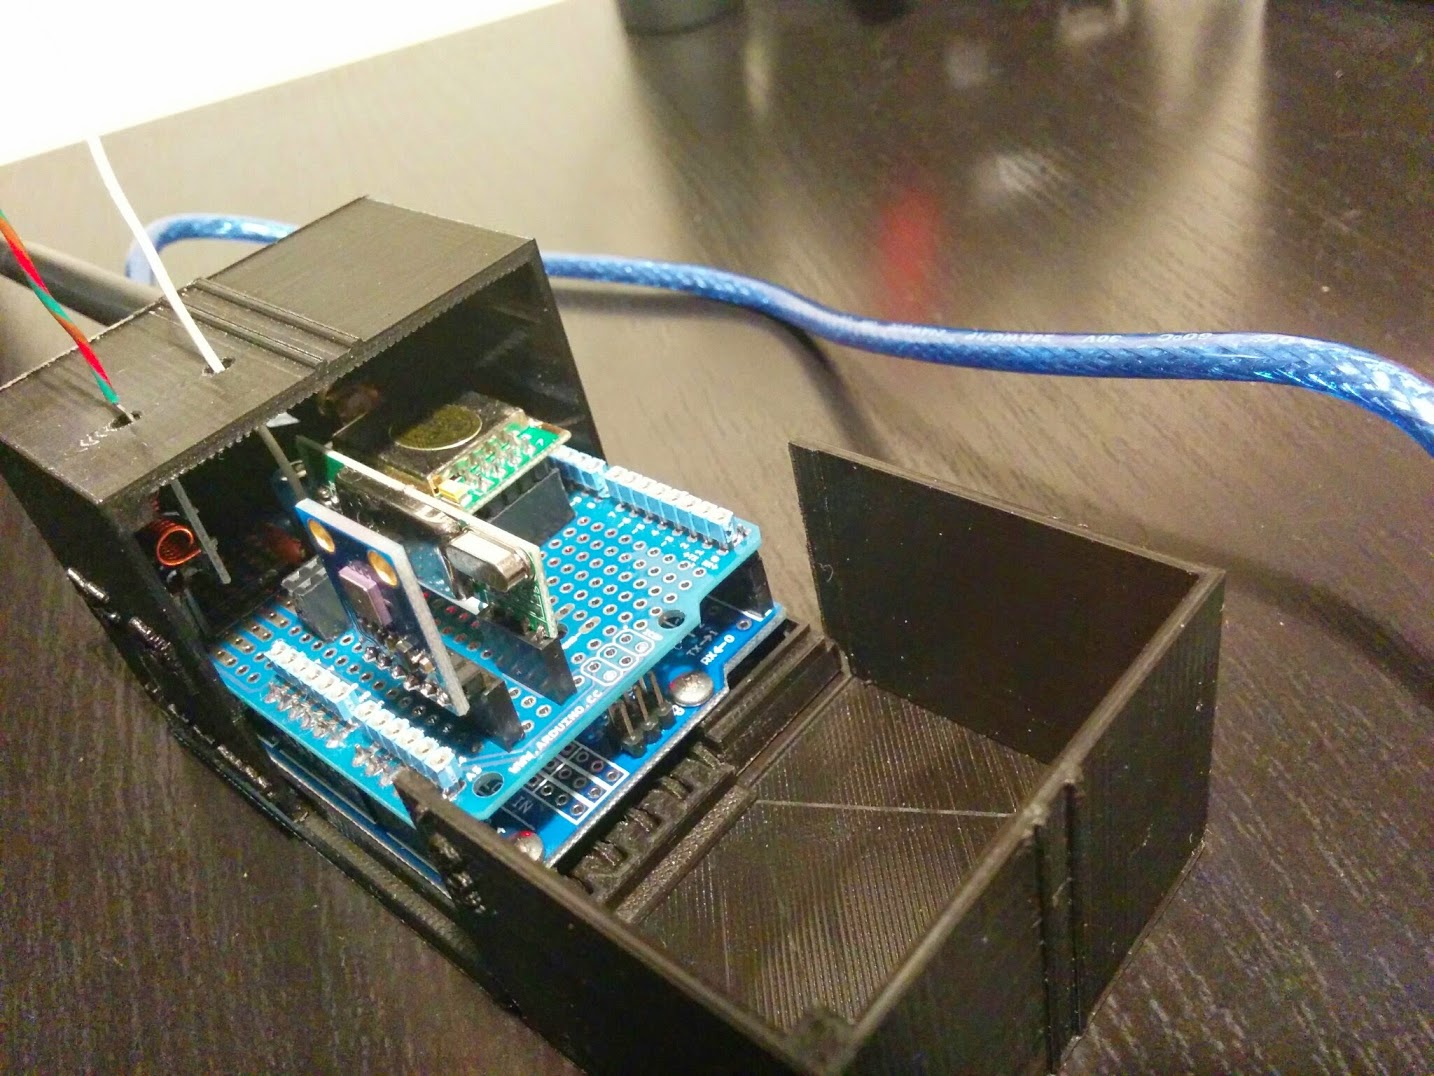
Making my house smart was obviously one of the first objectives. I first started with a simple RF plug socket to turn on the kitchen lights at dusk and off when everyone would have gone to bed. You can get one of these online or at any local DIY store. To control it, I built a RF gateway using an Arduino and very few electronic components (RF gateway alone, deserves a post of it’s own). Connected to an SBC that consumes less than 7W I could control any plug in the house either through a webpage or a command-line, furthermore I could use the internet to add knowledge to my system, such as knowing at which time the sunset takes place each day.
Cheap RF devices
Next move, was getting notifications of when someone entered the house. Again, cheap sensor bought online, and added a receiver to my existing RF gateway. These sensors are lousy for security purposes, but to know at which time everyone leaves/enters it is perfect. Having an RF receiver, it was easy to read information from yet another inexpensive devices: a weather station. The weather station could now help me decide when to sprinkle my balcony garden. About here I decided to complicate a bit more and decided I wanted a fully automated garden (better read about it in another post).
MQTTwarn
I did not built everything over the weekend, this was about the long run and having an hobby. I was making all things by my self and writing all the code, when suddenly I realized my wife was also enjoying the smarter house and friends were asking me about how to do the same. At this time I figured my system should become more professional and started evaluating existing projects. My first approach was to use MQTTwarn. All my sensors were already publishing to MQTT so it made a lot of sense to port my automation rules to MQTTwarn. The project is great with lots of plugins for various services, and in small use case scenarios it completely fits the purpose.
Nonetheless I was at that time limited to wireless devices, and to the lack of control points in the house (for lights, window covers, heating).
Version 2.0
When I bought my current house, bricks were still being laid. That gave me the opportunity to do some changes to the house project and have the house domotics done “my way”.
From the previous house and from the previous DIY system I learned what I really wanted to have and more importantly what I found most relevant. This was important to keep costs down, as I planned for an incremental upgrade of house controls.
Wireless vs Wired
First decision was to whether have a wired or wireless solution. Z-wave has become quite popular but wireless sensors require power, batteries are a bothersome, so cables became inevitable. The other very popular solution is KNX, which pretty much has become the standard in domotics. KNX is great is many aspects except the price and hack-ability (remember this is still my hobby). I really like the ability to control everything and to be able to change everything to my needs, so I opted to have a centralized control using an Arduino based PLC from Industrial Shields. I contracted an extra switch board in the space next to the energy and communications switch boards which would have pipes to everywhere in the house, enabling me in the future to either run extra cables or exchange the existing ones by new ones (future proofing). Also for future proof reasons I ran Cat6E cable everywhere (even if the sensor on the other side uses just 2 wires), having the cable in place saves you lots of work in the future.
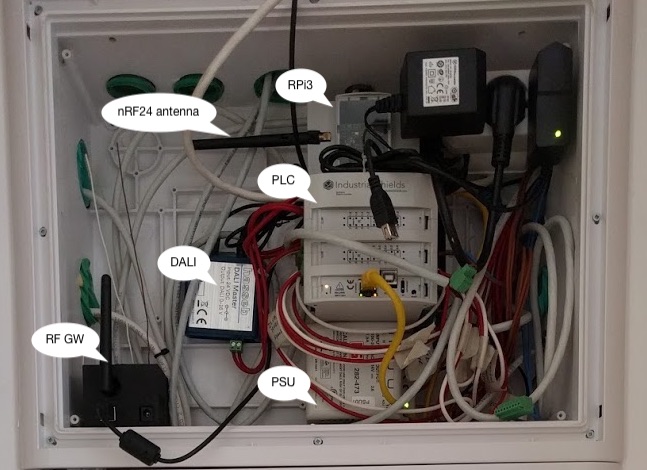
In the extra board I also placed a Raspberry Pi 3 to control everything, this was an upgrade from my previous system and got a perfect enclosure to place it in the board hanging from a DIN rail. The Raspberry has a nRF24 HAT for connecting to wireless sensors in the future. Since I was not putting to waste all my previous setup, I connected my existing RF gateway to the Raspberry.
Lights On
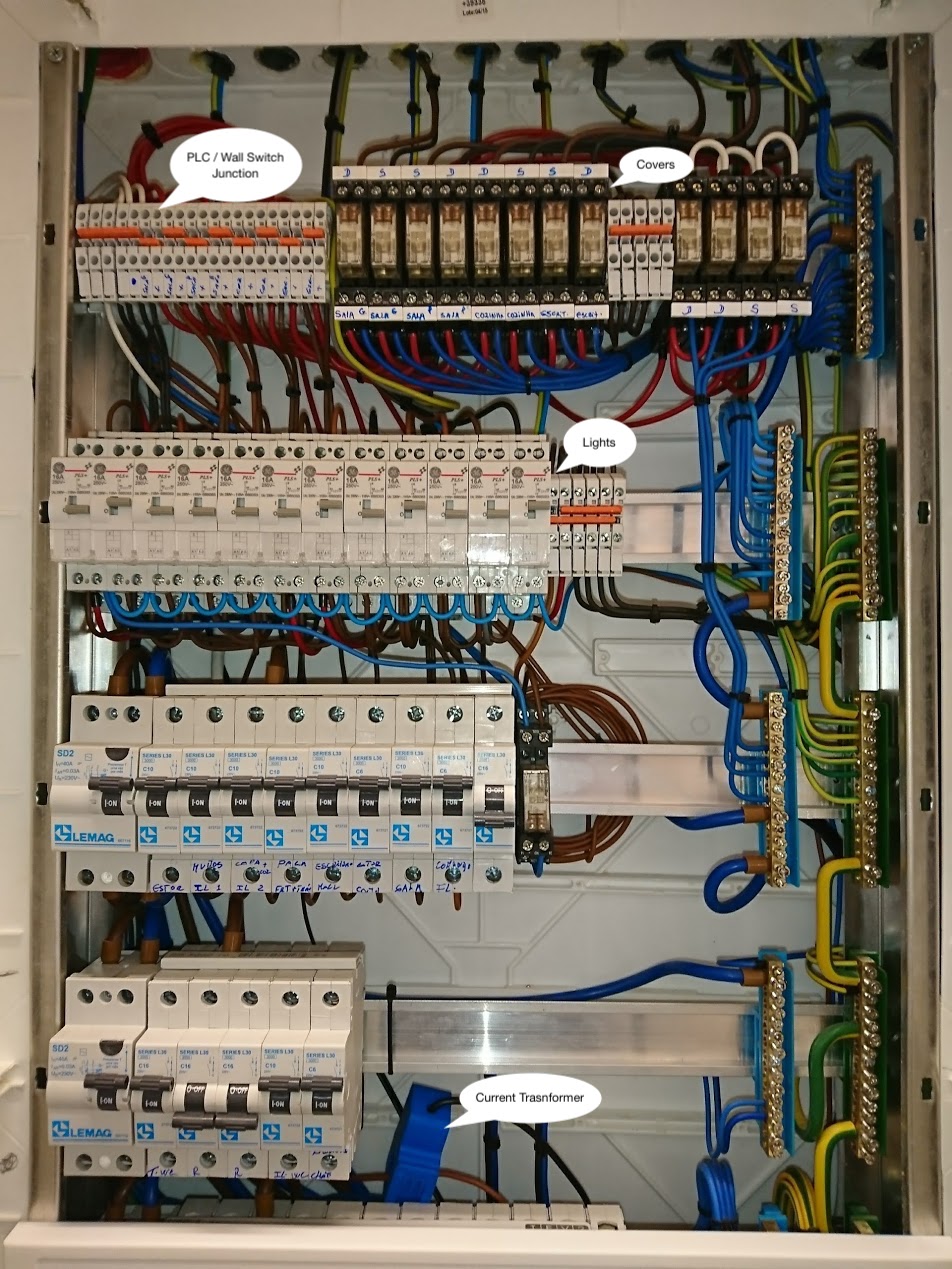
All light switches in the house are push buttons that toggle Impulse Relays, this means that pressing the button on the wall or through the PLC will have the same effect. This choice comes with a major disadvantage, I’m not aware if a light is ON or OFF, as I don’t keep track of the wall switch pushes. On the other hand the major advantage is that my PLC can be offline and all the light switches still work (I’m not dependent of the domotics system to work the lights).
For the living room I wanted to have a bit more control, such as the possibility of dimming individual head lights. Here I decided with the industry standard: DALI. I bought a USB based controller that I’ve connected to the Raspberry Pi 3. And the lights are controlled through a OSRAM DALI controller.
Window Covers
The window covers are motorized, again each window has two push buttons (up/down) and the PLC controls two relays (up/down) per window. The same as the lights applies here, I don’t know the position of the covers, but in this case I can send them all up or down (by pressing up/down for a long period of time) to reset their state to a known one.
Irrigation System
My new irrigation system comes with 2 poles to connect a trivial rain sensor (NO/NC), so I hooked those poles to the PLC and can control when the irrigation systems should work. The irrigation system runs a normal schedule and from the PLC, by simulating the rain sensor, I can disable the sprinkles whenever I find the need (already rained, raining, will rain shortly).
Scaling
If you do the math, I’m using too many ports for a single PLC. I splited my system between two PLCs by placing a second smaller and more basic PLC in the second floor switchboard and connected the two using a RS232 interface over Cat6E cable.
CCTV
Having run Cat6E all over the place, I installed an IP based CCTV system with a PoE switch. This system is more expensive that an analog one, but image quality is much better and PoE avoids the need to have several power adapters around. I’m using relative cheap cameras from HIKVISION model DS-2CD2020F-I. Since I distrust these equipments, they have a VLAN of their own and cannot communicate to the internet.
Energy Monitoring
Another important sensor is Energy monitoring. Since I’m all for Open Source and Hardware, I went with the emonTx V3 with a catch: Since I run cables everywhere I do not need the wireless transmitter and have replaced it with a serial interface that connects to my PLC. I have two clips: One measuring the total of my energy consumption (measured in the cable that comes from the power utility meter) and a second one measuring my heat-pump consumption (this equipment accounts for most of the house energy consumption, so I like to keep a close eye on it), in the future I plan to monitor a Photovoltaic installation (production) and the EV charger. You can find my fork of the firmware on GitHub.
Heating Monitoring
In the basement I have two large water tanks, one for the Underfloor heating (Piso Radiante Hidraulico - PRH) and another for sanitary hot waters (Águas Quentes Sanitárias - AQS). PRH tank is heated directly by a Heat-Pump and the AQS by Solar thermal collectors (with the heat-pump supporting when there is no sun). There were empty probe slots in the both deposits so I decided to datalog the temperatures and get a better idea of my energy expenses and savings. I’ve used inexpensive ds18b20 probes connected to an Arduino Yun. I could have gone for a cheaper solution, but since I already owned the Yun it was a no brainer. The Yun also monitors the underfloor heating circulation pump so I can know when the system has been used, using an LDR strapped tight to one the power leds of the pump.
Events/Motion detection
For security purposes I currently have a regular alarm system connected to a dispatch central. This system is closed sourced, so no tinkering for the duration of the contract. In order to detect when people enter/leave the house or the occupation of the rooms, I’ve installed several wireless sensors capable of transmitting on 433Mhz band.
- Door sensors
- Garage door sensor connected to an Arduino with an RF433 transmitter and used as a switch.
- Motion detectors
All these sensors can be easily integrated thanks to the RF gateway.
Home Assistant
Enough talking about hardware, how do I control everything? MQTTwarn was great, but as the new system became more complex a new control software was in need. I decided to stick with Python, so between OpenHAB, Domoticz and Home Assistant (the 3 main contendants) the choice was obvious. Home Assistant is also the newest kid on the block, which translates into a more modern software stack and user interface. I installed Home Assistant (HA) in the raspberry pi 3 that lies in the extra switch board, enabling direct access to the RF gateway (through serial interface) and to the DALI controller (also USB/Serial). Connecting HA to my house is done mostly through MQTT. I kept the mosquitto server from version 1.0 and connected most of the new hardware through MQTT: PLC relays’s, Heating Monitoring and a Sonoff RF Bridge 433. The Sonoff RF bridge is used in addition to the DIY RF Gateway, in order to increase range.
Owntracks
Many of the most interesting automations are related to localization of the home inhabitants (eg: light the porch when someone arrives home). HA fully integrates with Owntracks, a platform much similar to iOS Find my Friends that can track mobile devices and share location information. Owntracks has both an iOS and an Android version and requires a MQTT Broker which in my case is hosted on my VPS for security and reliability reasons.
Database/Graphing
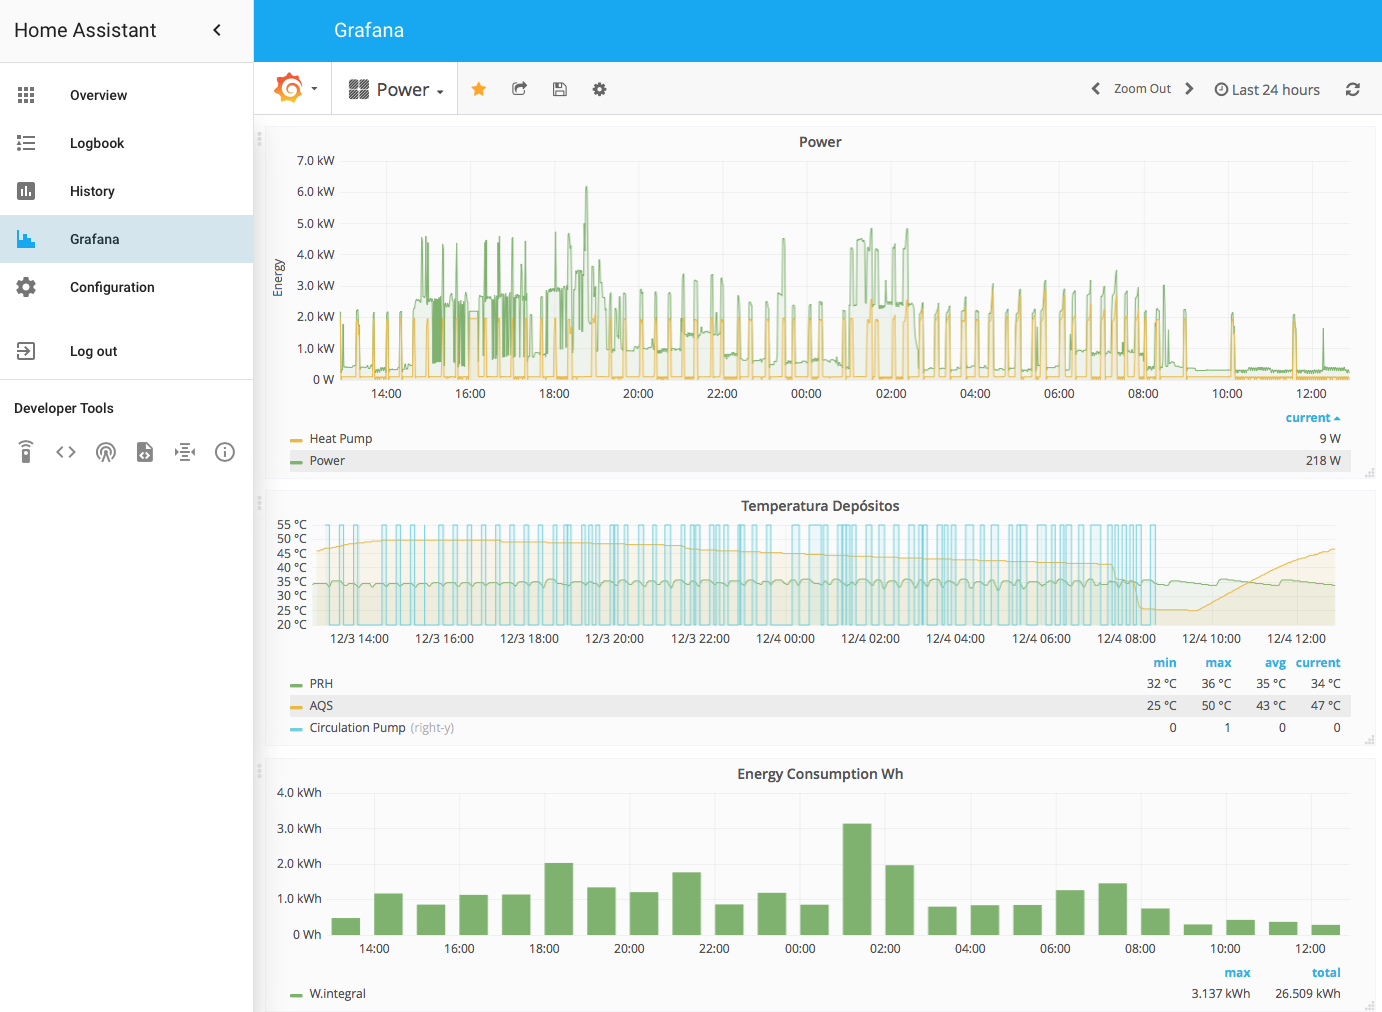
This system generates loads of information which I, as a data-scientist, like to keep around for future analysis. HA by default uses an SQLite database which is quite inappropriate to be run on the Raspberry Pi 3. To store everything I’m using a virtual machine inside my QNAP NAS. In this device I’ve setup MySQL as an alternative backend to HA, which keeps 7 days of history at most. InfluxDB, a time-series database that tracks all my history of only a specific set of sensors (energy, climate) and Grafana a time series analytics platform that can read all the history from influxdb.
Exposing
Exposing HA to the outside is dangerous, if you really need to do it, take has many security measurements as possible. In my current setup I expose only the Web interfaces of Grafana and HA through a NGINX reverse proxy. NGINX serves both websites through an SSL connection (thank you letsencrypt), protected with HTTP Auth and IP filter rules (limiting outside access to my work network). At home HA can be easily accessed through the home network.